

nuScenes数据集说明 - FunnyWii's Zone 一文了解nuScenes数据集的结构。
我们使用nuscenes-devkit进一步学习数据集的使用。
安装非常简单,建议python版本3.12和3.9。
pip install nuscenes-devkitdevkit使用
仍以 nuScenes 的 v1.0-mini 为例。
写了一个简单的工具函数用于统一输出分节标题。
"""utils.py
通用工具函数
统一输出分节标题,便于阅读终端日志
"""

def section(title: str) -> None:
	print(f"\n{'=' * 20} {title} {'=' * 20}")
scene
from nuscenes.nuscenes import NuScenes
from utils import section

# dataroot 需要指向 nuScenes 数据集根目录(包含 maps/samples/sweeps/v1.0-mini)。
nusc = NuScenes(version='v1.0-mini', dataroot='./data/v1.0-mini', verbose=True)

section('1) 场景列表')
print(nusc.list_scenes())

section('2) scene[0] 全字段')
scene_0 = nusc.scene[0]
print('scene[0]:', scene_0)

section('3) 核心字段速览')
print('name:', scene_0['name'])
print('description:', scene_0['description'])
print('nbr_samples:', scene_0['nbr_samples'])
print('first_sample_token:', scene_0['first_sample_token'])
print('last_sample_token:', scene_0['last_sample_token'])
NuScenes 类是数据集devkit的入口类。
使用类的 list_scenes() 方法,可以打印数据集概览,也就是 .json 文件中的统计数据,以及对场景的人工描述。
第3部分输出的字段,和 scene.json 中完全对应。
==================== 1) 场景列表 ====================
scene-0061, Parked truck, construction, intersectio... [18-07-24 03:28:47]   19s, singapore-onenorth, #anns:4622
scene-0103, Many peds right, wait for turning car, ... [18-08-01 19:26:43]   19s, boston-seaport, #anns:2046
scene-0655, Parking lot, parked cars, jaywalker, be... [18-08-27 15:51:32]   20s, boston-seaport, #anns:2332
scene-0553, Wait at intersection, bicycle, large tr... [18-08-28 20:48:16]   20s, boston-seaport, #anns:1950
scene-0757, Arrive at busy intersection, bus, wait ... [18-08-30 19:25:08]   20s, boston-seaport, #anns:592
scene-0796, Scooter, peds on sidewalk, bus, cars, t... [18-10-02 02:52:24]   20s, singapore-queensto, #anns:708
scene-0916, Parking lot, bicycle rack, parked bicyc... [18-10-08 07:37:13]   20s, singapore-queensto, #anns:2387
scene-1077, Night, big street, bus stop, high speed... [18-11-21 11:39:27]   20s, singapore-hollandv, #anns:890
scene-1094, Night, after rain, many peds, PMD, ped ... [18-11-21 11:47:27]   19s, singapore-hollandv, #anns:1762
scene-1100, Night, peds in sidewalk, peds cross cro... [18-11-21 11:49:47]   19s, singapore-hollandv, #anns:935
None

==================== 2) scene[0] 全字段 ====================
scene[0]: {'token': 'cc8c0bf57f984915a77078b10eb33198', 'log_token': '7e25a2c8ea1f41c5b0da1e69ecfa71a2', 'nbr_samples': 39, 'first_sample_token': 'ca9a282c9e77460f8360f564131a8af5', 'last_sample_token': 'ed5fc18c31904f96a8f0dbb99ff069c0', 'name': 'scene-0061', 'description': 'Parked truck, construction, intersection, turn left, following a van'}

==================== 3) 核心字段速览 ====================
name: scene-0061
description: Parked truck, construction, intersection, turn left, following a van
nbr_samples: 39
first_sample_token: ca9a282c9e77460f8360f564131a8af5
last_sample_token: ed5fc18c31904f96a8f0dbb99ff069c0
根据输出结果可以看出:
nusc变量:实例化后的入口list_scenes()方法:输出统计的(非.json原生)场景信息scene[xxx]数组:获取对应idx的场景scene_0['xxx']字典:输出.json对应字段
sample
注意没有 second_sample_token 哈,first_sample_token是 .json 文件中的一个字段。
一个 scene 中 包含了19-20s的视频,按照2Hz的频率采样,每个 sample 就是一个 Key frame。
nusc = NuScenes(version='v1.0-mini', dataroot='./data/v1.0-mini', verbose=False)
scene_0 = nusc.scene[0]

section('1) 读取场景第一个 sample token')
first_sample_token = scene_0['first_sample_token']
print('first_sample_token:', first_sample_token)

section('2) 通过 token 获取 sample 记录')
sample_0 = nusc.get('sample', first_sample_token)
print('sample_0:', sample_0)

section('3) sample 结构要点')
print('timestamp:', sample_0['timestamp'])
print('prev token:', sample_0['prev'])
print('next token:', sample_0['next'])
print('sensor channels:', list(sample_0['data'].keys()))
print('annotation count:', len(sample_0['anns']))

section('4) 使用 list_sample 查看结构化摘要')
nusc.list_sample(sample_0['token'])
会打印如下信息,因为太长,所以我手动省略了一部分。
这个 sample 中,包含69个标注。
==================== 1) 读取场景第一个 sample token ====================
first_sample_token: ca9a282c9e77460f8360f564131a8af5

==================== 2) 通过 token 获取 sample 记录 ====================
sample_0: {'token': 'ca9a282c9e77460f8360f564131a8af5',
'timestamp': 1532402927647951,
'prev': '',
'next': '39586f9d59004284a7114a68825e8eec',
'scene_token': 'cc8c0bf57f984915a77078b10eb33198',
'data': {'RADAR_FRONT': '37091c75b9704e0daa829ba56dfa0906', 'RADAR_FRONT_LEFT': '11946c1461d14016a322916157da3c7d', 'RADAR_FRONT_RIGHT': '491209956ee3435a9ec173dad3aaf58b', 'RADAR_BACK_LEFT': '312aa38d0e3e4f01b3124c523e6f9776', 'RADAR_BACK_RIGHT': '07b30d5eb6104e79be58eadf94382bc1', 'LIDAR_TOP': '9d9bf11fb0e144c8b446d54a8a00184f', 'CAM_FRONT': 'e3d495d4ac534d54b321f50006683844', 'CAM_FRONT_RIGHT': 'aac7867ebf4f446395d29fbd60b63b3b', 'CAM_BACK_RIGHT': '79dbb4460a6b40f49f9c150cb118247e', 'CAM_BACK': '03bea5763f0f4722933508d5999c5fd8', 'CAM_BACK_LEFT': '43893a033f9c46d4a51b5e08a67a1eb7', 'CAM_FRONT_LEFT': 'fe5422747a7d4268a4b07fc396707b23'},
'anns': ['ef63a697930c4b20a6b9791f423351da',
# ...总共69个标注
'18cc2837f2b9457c80af0761a0b83ccc', '2bfcc693ae9946daba1d9f2724478fd4']}

==================== 3) sample 结构要点 ====================
timestamp: 1532402927647951
prev token:
next token: 39586f9d59004284a7114a68825e8eec
sensor channels: ['RADAR_FRONT', 'RADAR_FRONT_LEFT', 'RADAR_FRONT_RIGHT', 'RADAR_BACK_LEFT', 'RADAR_BACK_RIGHT', 'LIDAR_TOP', 'CAM_FRONT', 'CAM_FRONT_RIGHT', 'CAM_BACK_RIGHT', 'CAM_BACK', 'CAM_BACK_LEFT', 'CAM_FRONT_LEFT']
annotation count: 69

==================== 4) 使用 list_sample 查看结构化摘要 ====================
Sample: ca9a282c9e77460f8360f564131a8af5

sample_data_token: 37091c75b9704e0daa829ba56dfa0906, mod: radar, channel: RADAR_FRONT
sample_data_token: 11946c1461d14016a322916157da3c7d, mod: radar, channel: RADAR_FRONT_LEFT
sample_data_token: 491209956ee3435a9ec173dad3aaf58b, mod: radar, channel: RADAR_FRONT_RIGHT
sample_data_token: 312aa38d0e3e4f01b3124c523e6f9776, mod: radar, channel: RADAR_BACK_LEFT
sample_data_token: 07b30d5eb6104e79be58eadf94382bc1, mod: radar, channel: RADAR_BACK_RIGHT
sample_data_token: 9d9bf11fb0e144c8b446d54a8a00184f, mod: lidar, channel: LIDAR_TOP
sample_data_token: e3d495d4ac534d54b321f50006683844, mod: camera, channel: CAM_FRONT
sample_data_token: aac7867ebf4f446395d29fbd60b63b3b, mod: camera, channel: CAM_FRONT_RIGHT
sample_data_token: 79dbb4460a6b40f49f9c150cb118247e, mod: camera, channel: CAM_BACK_RIGHT
sample_data_token: 03bea5763f0f4722933508d5999c5fd8, mod: camera, channel: CAM_BACK
sample_data_token: 43893a033f9c46d4a51b5e08a67a1eb7, mod: camera, channel: CAM_BACK_LEFT
sample_data_token: fe5422747a7d4268a4b07fc396707b23, mod: camera, channel: CAM_FRONT_LEFT

sample_annotation_token: ef63a697930c4b20a6b9791f423351da, category: human.pedestrian.adult
# ...总共69个标注
sample_annotation_token: 2bfcc693ae9946daba1d9f2724478fd4, category: movable_object.barrier
根据输出可以看出:
因为所有
.json文件中的每个对象都必定有一个token字段,可以通过该字段获取token。这里和 scene 不同,取对象使用token而非idx索引get()方法:通过token去0号sample里获取内容,然后通过键取0号 sample 的对应字段内容通过
list_sample()方法查看0号 sample 的结构化摘要
sample_data
import matplotlib
matplotlib.use('Agg')
import matplotlib.pyplot as plt
from nuscenes.nuscenes import NuScenes
from utils import section
nusc = NuScenes(version='v1.0-mini', dataroot='./data/v1.0-mini', verbose=False)
scene_0 = nusc.scene[0]
section('1) 读取第一个 sample')
first_sample_token = scene_0['first_sample_token']
sample_0 = nusc.get('sample', first_sample_token)
section('2) 查看 sample.data 传感器映射')
data = sample_0['data']
print('sample_0[\'data\']:', data)
section('3) 获取指定通道的 sample_data')
channel = 'CAM_BACK'
sample_data_record = nusc.get('sample_data', data[channel])
print('channel:', channel)
print('sample_data_record:', sample_data_record)
section('4) 联查标定和位姿信息')
calibrated_sensor = nusc.get('calibrated_sensor', sample_data_record['calibrated_sensor_token'])
sensor = nusc.get('sensor', calibrated_sensor['sensor_token'])
ego_pose = nusc.get('ego_pose', sample_data_record['ego_pose_token'])
print('sensor channel:', sensor['channel'])
print('sensor modality:', sensor['modality'])
print('calibrated_sensor translation:', calibrated_sensor['translation'])
print('ego_pose translation:', ego_pose['translation'])
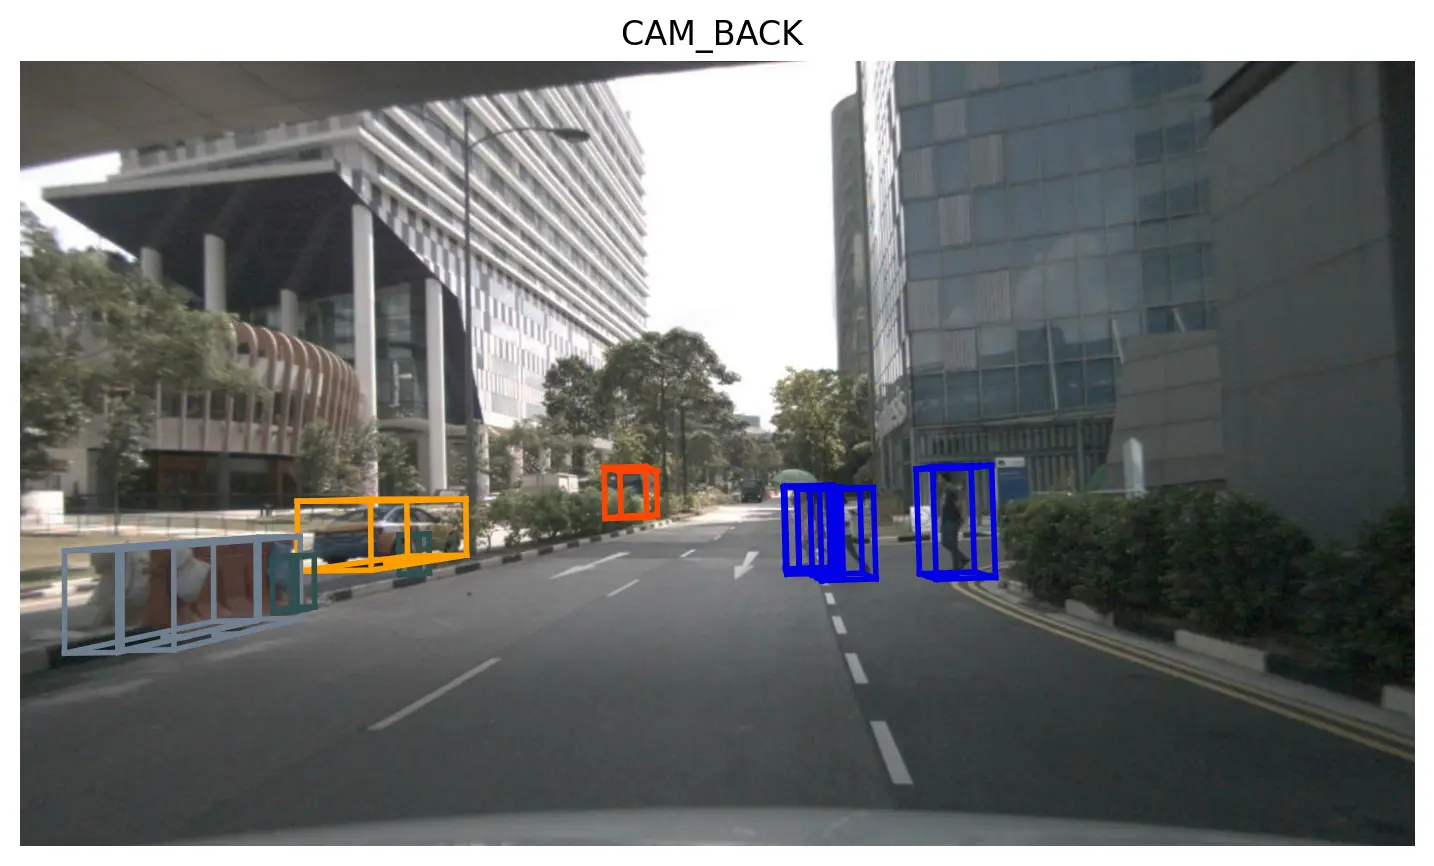
section('5) 保存可视化结果')
nusc.render_sample_data(sample_data_record['token'])
output_path = 'sample_data_cam_back.png'
plt.savefig(output_path, dpi=200, bbox_inches='tight')
plt.close()
print('saved figure to', output_path)
这里section 1)中获取第0号sample的方式和sample.py一致,因此不再赘述。
==================== 1) 读取第一个 sample ====================

==================== 2) 查看 sample.data 传感器映射 ====================
sample_0['data']: {'RADAR_FRONT': '37091c75b9704e0daa829ba56dfa0906', 'RADAR_FRONT_LEFT': '11946c1461d14016a322916157da3c7d', 'RADAR_FRONT_RIGHT': '491209956ee3435a9ec173dad3aaf58b', 'RADAR_BACK_LEFT': '312aa38d0e3e4f01b3124c523e6f9776', 'RADAR_BACK_RIGHT': '07b30d5eb6104e79be58eadf94382bc1', 'LIDAR_TOP': '9d9bf11fb0e144c8b446d54a8a00184f', 'CAM_FRONT': 'e3d495d4ac534d54b321f50006683844', 'CAM_FRONT_RIGHT': 'aac7867ebf4f446395d29fbd60b63b3b', 'CAM_BACK_RIGHT': '79dbb4460a6b40f49f9c150cb118247e', 'CAM_BACK': '03bea5763f0f4722933508d5999c5fd8', 'CAM_BACK_LEFT': '43893a033f9c46d4a51b5e08a67a1eb7', 'CAM_FRONT_LEFT': 'fe5422747a7d4268a4b07fc396707b23'}

==================== 3) 获取指定通道的 sample_data ====================
channel: CAM_BACK
sample_data_record: {'token': '03bea5763f0f4722933508d5999c5fd8', 'sample_token': 'ca9a282c9e77460f8360f564131a8af5', 'ego_pose_token': '03bea5763f0f4722933508d5999c5fd8', 'calibrated_sensor_token': '4ff47c4950f04cb4be1876bc0b028326', 'timestamp': 1532402927637525, 'fileformat': 'jpg', 'is_key_frame': True, 'height': 900, 'width': 1600, 'filename': 'samples/CAM_BACK/n015-2018-07-24-11-22-45+0800__CAM_BACK__1532402927637525.jpg', 'prev': '', 'next': '39c5557eadb443f2bfc8698605b1967a', 'sensor_modality': 'camera', 'channel': 'CAM_BACK'}

==================== 4) 联查标定和位姿信息 ====================
sensor channel: CAM_BACK
sensor modality: camera
calibrated_sensor translation: [0.0283260309358, 0.00345136761476, 1.57910346144]
ego_pose translation: [411.33787291696916, 1180.980332035968, 0.0]
这里演示了
sample_0['data']获取0号sample的data,输出内容和sample.py的section 2)中data部分一致传感器通道
data[channel]这里本质上仍然是根据字典取内容。流程翻译一下就是 scene 0 的 sample 0 的 CAM_BACK sensor 的数据。看到 section 4)应该对
get()函数基本了解了。get()函数的功能还算统一,返回值是一个 dict,参数是table和token。table和.json文件名对应。nusc.render_sample_data()方法可以绘制指定 sample 的可视化结果
传感器数据可视化:
sample_annotation
import matplotlib
matplotlib.use('Agg')
import matplotlib.pyplot as plt
from nuscenes.nuscenes import NuScenes
from utils import section
nusc = NuScenes(version='v1.0-mini', dataroot='./data/v1.0-mini', verbose=False)
scene_0 = nusc.scene[0]
section('1) 获取第一个 sample 的 annotation token 列表')
first_sample_token = scene_0['first_sample_token']
sample_0 = nusc.get('sample', first_sample_token)
annotation_index = len(sample_0['anns']) - 1
annotation_token = sample_0['anns'][annotation_index]
print('annotation index:', annotation_index)
print('annotation token:', annotation_token)
section('2) 查询 sample_annotation 记录')
annotation_record = nusc.get('sample_annotation', annotation_token)
print('annotation_record:', annotation_record)
section('3) 联查 instance/category/visibility')
instance_record = nusc.get('instance', annotation_record['instance_token'])
visibility_record = nusc.get('visibility', annotation_record['visibility_token'])
category_record = nusc.get('category', instance_record['category_token'])
print('instance token:', instance_record['token'])
print('visibility level:', visibility_record['level'])
print('category name:', category_record['name'])
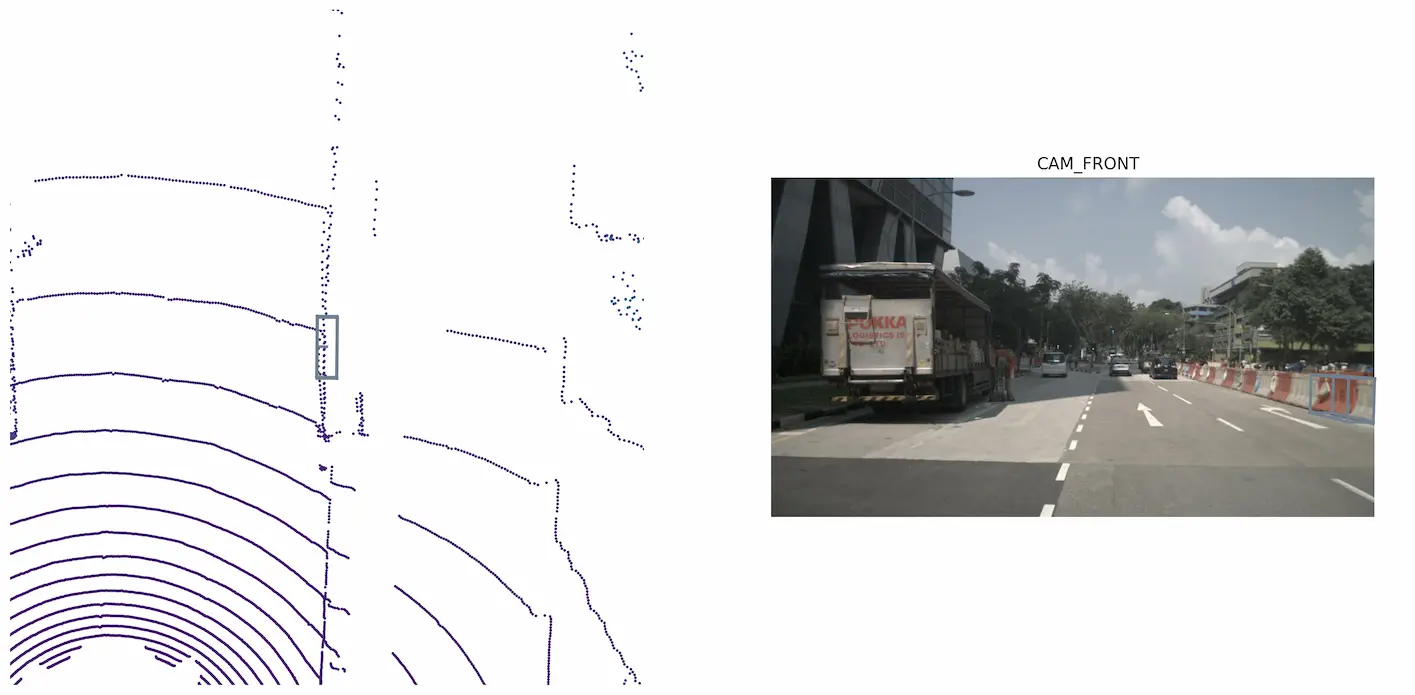
section('4) 保存 annotation 可视化结果')
nusc.render_annotation(annotation_record['token'])
output_path = 'sample_annotation_idx68.png'
plt.savefig(output_path, dpi=200, bbox_inches='tight')
plt.close()
print('saved figure to', output_path)运行结果:
==================== 1) 获取第一个 sample 的 annotation token 列表 ====================
annotation index: 68
annotation token: 2bfcc693ae9946daba1d9f2724478fd4

==================== 2) 查询 sample_annotation 记录 ====================
annotation_record: {'token': '2bfcc693ae9946daba1d9f2724478fd4', 'sample_token': 'ca9a282c9e77460f8360f564131a8af5', 'instance_token': '5ae085634a294735ada287659b488378', 'visibility_token': '4', 'attribute_tokens': [], 'translation': [399.773, 1169.799, 0.536], 'size': [1.99, 0.651, 1.107], 'rotation': [-0.9837693673542263, 0.0, 0.0, 0.1794375430490104], 'prev': '', 'next': '84895462e744418abedd7cfef913c09f', 'num_lidar_pts': 27, 'num_radar_pts': 2, 'category_name': 'movable_object.barrier'}

==================== 3) 联查 instance/category/visibility ====================
instance token: 5ae085634a294735ada287659b488378
visibility level: v80-100
category name: movable_object.barrier
标注数据长度69,最大索引68。注意按idx取数据不要超出边界。
section 3)的
get()方法仍然是在按table和token获取数据。nusc.render_annotation()方法可以绘制指定索引的标注的可视化结果。
instance
import matplotlib

matplotlib.use('Agg')
import matplotlib.pyplot as plt
from nuscenes.nuscenes import NuScenes
from utils import section


nusc = NuScenes(version='v1.0-mini', dataroot='./data/v1.0-mini', verbose=False)

section('1) 获取 instance[0]')
instance_0 = nusc.instance[0]
print('instance_0:', instance_0)

section('2) 核心字段说明')
instance_token = instance_0['token']
print('instance_token:', instance_token)
print('nbr_annotations:', instance_0['nbr_annotations'])
print('first_annotation_token:', instance_0['first_annotation_token'])
print('last_annotation_token:', instance_0['last_annotation_token'])

section('3) 读取该 instance 的起始标注')
first_annotation = nusc.get('sample_annotation', instance_0['first_annotation_token'])
print('first_annotation category:', first_annotation['category_name'])
print('first_annotation translation:', first_annotation['translation'])

section('4) 保存 instance 可视化结果')
nusc.render_instance(instance_token)
output_path = 'instance_0.png'
plt.savefig(output_path, dpi=200, bbox_inches='tight')
plt.close()
print('saved figure to', output_path)
先获取第 0 个 instance,然后打印对象的各个字段。
因为 instance 和 annotation 是直接联系在一起的,所以获取 instance 的目的也就是获取 annotation。在
sample_annotation.json中应该有6dd2cbf4c24b4caeb625035869bca7b5的39条记录。render_instance() 可以可视化 instance。
==================== 1) 获取 instance[0] ====================
instance_0: {'token': '6dd2cbf4c24b4caeb625035869bca7b5', 'category_token': '1fa93b757fc74fb197cdd60001ad8abf', 'nbr_annotations': 39, 'first_annotation_token': 'ef63a697930c4b20a6b9791f423351da', 'last_annotation_token': '8bb63134d48840aaa2993f490855ff0d'}

==================== 2) 核心字段说明 ====================
instance_token: 6dd2cbf4c24b4caeb625035869bca7b5
nbr_annotations: 39
first_annotation_token: ef63a697930c4b20a6b9791f423351da
last_annotation_token: 8bb63134d48840aaa2993f490855ff0d

==================== 3) 读取该 instance 的起始标注 ====================
first_annotation category: human.pedestrian.adult
first_annotation translation: [373.256, 1130.419, 0.8]
说明
代码已经开源到github仓库:https://github.com/Hachimi-Manbo/nuScenes-Devkit-Intro
学习流程参考 https://zhuanlan.zhihu.com/p/549764492 ,使用GPT-Codex统一代码风格并完善注释。
如果想要使用软件可视化nuScenes标注,可以参考nuScenes格式数据可视化验证标注效果这篇文章
评论