

PCIe-GL26
先看看 PCIe-GL26 是个什么设备。
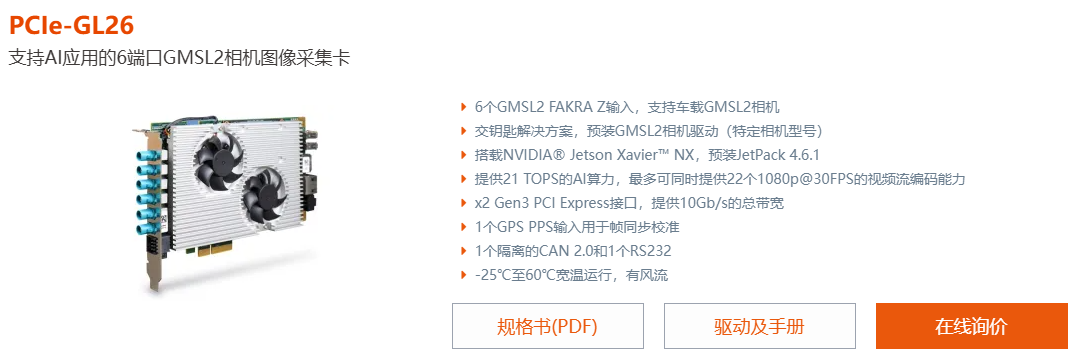
本质上,它是一个自带 Jetson Xavier 系统,且带有 6 路 GMSL2 接口的图像采集卡。
GMSL2 是 Gigabit Multimedia Serial Link 2,注意这个和 GIGABYTE 技嘉科技 没啥关系。GMSL 翻译一下就是千兆多媒体串行链路,是 ADI 公司的产品。GMSL 设备可以通过同轴电缆或双绞线实现视频数据和控制数据的双向通信。
GMSL1 代产品的前向通道链路速率可达 1.5 Gbps 或 3 Gbps,反向通道速率为 1 Mbps;GMSL2 代产品的前向通道速率可达 3 Gbps 或 6 Gbps,反向通道速率为 187.5 Mbps 或 1.5 Gbps。此外,相比 CSI 相机约 300 mm 的传输距离,GMSL 传输距离可达 20 m。
HOST
GL26 图像采集卡需要通过 PCIe 接口接到 x86 主板上。x86 HOST 设备的环境配置参见 Getting Started | NRU Series,推荐手动安装。
然后安装 GStreamer:
sudo apt-get install -y \
  libgstreamer1.0-dev \
  libgstreamer-plugins-base1.0-dev \
  libgstreamer-plugins-bad1.0-dev \
  gstreamer1.0-plugins-base \
  gstreamer1.0-plugins-good \
  gstreamer1.0-plugins-bad \
  gstreamer1.0-plugins-ugly \
  gstreamer1.0-libav \
  gstreamer1.0-doc \
  gstreamer1.0-tools \
  gstreamer1.0-x \
  gstreamer1.0-alsa \
  gstreamer1.0-gl \
  gstreamer1.0-gtk3 \
  gstreamer1.0-qt5 \
  gstreamer1.0-pulseaudio
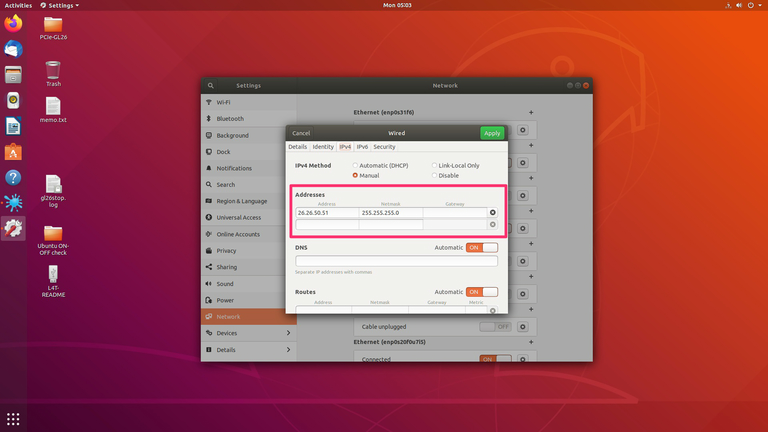
然后设置 HOST 对应网络端口 Aquantia Ethernet 的 IPv4 地址为 26.26.50.51,子网掩码为 255.255.255.0。
GL26 里应有一个 Ubuntu 18.04 系统,而且在路径 /home/nvidia/Desktop/PCIe-GL26-Release/GMSL2-Camera-Release 下应该有很多相机配置文件。如果没有这些文件,系统可能有问题,需要重新刷系统;如果连系统都没有,那就更需要重刷系统了。
重新刷 HOST
一般情况下不需要重新刷 HOST,系统安装方式和其他 x86 Ubuntu 安装方式一样。
重新刷 GL26
重新刷系统参见 Reflash PCIe-GL26 | NRU Series。
所需硬件:
- Ubuntu 18.04 的 x86 架构电脑,并且带有 USB-A 接口。啥是 USB-A?就是你正着插插不进去,又反过来插还是插不进去,然后再正过来插,结果插进去了的那个 USB-A。
- USB-A 转 Micro-USB 的线。注意这些线有的只有充电功能,不支持数据传输,我们需要能够传输数据的线。
所需软件:
首先找 Neousys 的工程师要一份刷机用系统镜像,约 12 GB。Welcome | neousys-tech.com 需要密码,如果你没密码,我也没有,去找厂家要。
趁着这功夫,把 HOST 和 GL26 都关机,并物理断电,确保真的断电。将 GL26 的 4 pin 拨码中的 3 号拨码拨上去,以进入 Recovery mode。什么你找不到拨码?都要刷系统了,你不会还没把外壳拆开吧……
插上 USB-A(Ubuntu 18 电脑)到 Micro-USB(GL26)的那根线,然后 HOST 开机。
在 Ubuntu 18 设备上运行:
sdkmanager --archivedversions
SDK Manager 从 Step 01 运行到 Step 04。注意 Step 01 的 OS 选择 JetPack 4.6.1,最终会在 $HOME/nvidia/nvidia_sdk/JetPack_4.6.1_Linux_JETSON_XAVIER_NX_TARGETS/Linux_for_Tegra 目录下生成一堆文件。
然后将系统镜像放到这个目录中,运行脚本:
flash_withimage_xxxxxxxxx.sh
相比官方教程中使用的 flash.sh,这个名字很长的脚本会使用目录中的系统镜像安装系统。
其实上述方法在 Reflash PCIe-GL26 | NRU Series 的第 3 点中也有提及。
GL26 中的相机配置文件
可以使用 SSH 方法在 HOST 上访问 GL26。如果外壳还没装回去,也可以插 DP 线和键鼠直接操作 GL26。
/home/nvidia/Desktop/PCIe-GL26-Release/GMSL2-Camera-Release 中的 data.cfg 应有如下内容:
# data.cfg
CAM_MODEL="AC-IMX390"  # Options: AC-IMX390, AC-AR0233
DETECTED_CAM="0 1 2 3 4 5 "
TRIGGER_MODE="FREERUN" # Options: FREERUN, MCU
VIDEO_ENCODE="RAW"    # Options: RAW, H264
VIDEO_STREAMING="HOST" # Options: STANDALONE, HOST
CAM_MODEL:相机型号。注意 IMX390C 型号的相机需要使用AC-AR0233配置。DETECTED_CAM:检测到的相机 ID。GL26 上靠近黑色端子的编号为 5。如果上电前已经插好相机,应该会自动识别出来。TRIGGER_MODE:选择FREERUN。VIDEO_ENCODE:RAW和H264皆可,不过我使用H264存在果冻现象,所以我用RAW。VIDEO_STREAMING:HOST。
修改好后,在 GL26 上运行:
sudo ./init_GMSL.sh
然后根据你的相机配置,运行对应的初始化脚本:
sudo ./init_6x_xxxxxxxxxxx.sh
HOST 上使用 GStreamer 获取相机图像
命令行获取
每次重启 HOST 后,先设置网口带宽:
sudo -s

sudo ifconfig enp1s0 mtu 16000
sudo /sbin/sysctl -w net.core.rmem_max=671088640
sudo /sbin/sysctl -w net.core.wmem_max=671088640
sudo /sbin/sysctl -w net.core.rmem_default=671088640
sudo /sbin/sysctl -w net.core.wmem_default=671088640
建议写成开机自启脚本。如果我微不足道的脑容量能让我记得这件事,我会写一个脚本回来贴上。
读取 RAW 格式的相机图像用如下命令,其中 port 对应相机编号。
# Host (30 FPS)
gnome-terminal -- gst-launch-1.0 udpsrc buffer_size=9216000 port=10000 caps="application/x-rtp, media=(string)video, clock-rate=(int)90000, encoding-name=(string)RAW, sampling=(string)YCbCr-4:2:2, depth=(string)8, width=(string)1920, height=(string)1080, colorimetry=(string)BT601-5, payload=(int)96, a-framerate=(string)30" ! rtpjitterbuffer latency=30 ! rtpvrawdepay ! videoconvert ! fpsdisplaysink name=fps video-sink=xvimagesink sync=false
gnome-terminal -- gst-launch-1.0 udpsrc buffer_size=9216000 port=10001 caps="application/x-rtp, media=(string)video, clock-rate=(int)90000, encoding-name=(string)RAW, sampling=(string)YCbCr-4:2:2, depth=(string)8, width=(string)1920, height=(string)1080, colorimetry=(string)BT601-5, payload=(int)96, a-framerate=(string)30" ! rtpjitterbuffer latency=30 ! rtpvrawdepay ! videoconvert ! fpsdisplaysink name=fps video-sink=xvimagesink sync=false
gnome-terminal -- gst-launch-1.0 udpsrc buffer_size=9216000 port=10002 caps="application/x-rtp, media=(string)video, clock-rate=(int)90000, encoding-name=(string)RAW, sampling=(string)YCbCr-4:2:2, depth=(string)8, width=(string)1920, height=(string)1080, colorimetry=(string)BT601-5, payload=(int)96, a-framerate=(string)30" ! rtpjitterbuffer latency=30 ! rtpvrawdepay ! videoconvert ! fpsdisplaysink name=fps video-sink=xvimagesink sync=false
gnome-terminal -- gst-launch-1.0 udpsrc buffer_size=9216000 port=10003 caps="application/x-rtp, media=(string)video, clock-rate=(int)90000, encoding-name=(string)RAW, sampling=(string)YCbCr-4:2:2, depth=(string)8, width=(string)1920, height=(string)1080, colorimetry=(string)BT601-5, payload=(int)96, a-framerate=(string)30" ! rtpjitterbuffer latency=30 ! rtpvrawdepay ! videoconvert ! fpsdisplaysink name=fps video-sink=xvimagesink sync=false
gnome-terminal -- gst-launch-1.0 udpsrc buffer_size=9216000 port=10004 caps="application/x-rtp, media=(string)video, clock-rate=(int)90000, encoding-name=(string)RAW, sampling=(string)YCbCr-4:2:2, depth=(string)8, width=(string)1920, height=(string)1080, colorimetry=(string)BT601-5, payload=(int)96, a-framerate=(string)30" ! rtpjitterbuffer latency=30 ! rtpvrawdepay ! videoconvert ! fpsdisplaysink name=fps video-sink=xvimagesink sync=false
gnome-terminal -- gst-launch-1.0 udpsrc buffer_size=9216000 port=10005 caps="application/x-rtp, media=(string)video, clock-rate=(int)90000, encoding-name=(string)RAW, sampling=(string)YCbCr-4:2:2, depth=(string)8, width=(string)1920, height=(string)1080, colorimetry=(string)BT601-5, payload=(int)96, a-framerate=(string)30" ! rtpjitterbuffer latency=30 ! rtpvrawdepay ! videoconvert ! fpsdisplaysink name=fps video-sink=xvimagesink sync=false
代码获取
将下面字符串作为 GStreamer 的 pipeline,即可使用 OpenCV 读取相机图像:
udpsrc port=10000 caps="application/x-rtp, media=(string)video, encoding-name=(string)RAW, sampling=(string)YCbCr-4:2:2, depth=(string)8, width=(string)1920, height=(string)1080, payload=(int)96, framerate=(string)30, interlace-mode=(string)progressive, format=(string)UYVY" ! rtpvrawdepay ! videoconvert ! appsink drop=true sync=true async=false
需要注意
断电重启
HOST 和 GL26 上是两个系统,但 GL26 并不依赖于 HOST 供电。HOST 的重启操作可能导致 GL26 并不能真正关闭。根据 Stop Script and Gentle Shutdown | NRU Series 文档中的描述,不当关机操作有万分之五概率损坏 GL26。
如果想让 GL26 真正关机,有两种方法:
- 在 SSH 中执行
sudo shutdown now。 - 物理断电(不推荐)。
评论