

相比之前的模型,YOLOv8 引入了新的 backbone、新的 Anchor-Free 检测头和新的损失函数,可以在从 CPU 到 GPU 的多种硬件平台上运行。

模型的训练 - Ultralytics
最开始我是使用 Ultralytics 框架训练,因为这个框架非常简单。不过它导出的 binding 我实在是看不明白,因此介绍完这种方法后,我会再介绍一下 MMYOLO 框架下的模型训练。后续 C++ 部署也会使用 MMYOLO 训练得到的模型。在此十分感谢清华孙博士提供的帮助,虽然他 100% 看不到这篇 blog。
这里需要补充一点:不同导出方式(ONNX / TensorRT / end2end NMS)会导致输出张量结构不同,所以部署时一定要先用 Netron 或 TensorRT API 看清楚输入输出名称、shape 和数据类型。
已训练好的模型可以从 https://github.com/ultralytics/assets/releases 下载。
YOLOv8 的训练非常简单。首先新建一个 conda 环境,要求 Python >= 3.8。激活环境后运行:
pip install ultralytics
这会安装 ultralytics,其中包含 YOLOv8 相关依赖。
之后可以 clone Ultralytics 仓库(可选),仓库中包含一些可能会用到的 yaml 文件:https://github.com/ultralytics/ultralytics
你的数据集
如果想要根据自己的需求训练数据集,想必你已经采集好了数据集并做好了相应标注。
我的模型任务是检测道路上的红绿灯。截至目前已经采集了 800+ 张照片,最终的数据集规模大概在 3000+。为了提高模型泛化能力,需要在多个场景下采集红绿灯图像,包含白天晴天、白天阴天、白天雨天、白天雾天、夜间晴天、夜间雨天、夜间雾天和凌晨等。不过因为对场景要求太多((;´༎ຶД༎ຶ) 对不起!我的实习生朋友们),数据还没有采集完,不过这不影响我先训着。
首先将已有数据集划分为训练集和验证集,按 7:3 或者 8:2 的比例划分。文件夹结构如下:
.
├── images
│   ├── train
│   │   ├── Image100.jpg
│   └── val
│       ├── Image601.jpg
└── labels
    ├── train
    │   ├── Image100.txt
    ├── val
    │   ├── Image601.txt
数据集路径和具体分类任务信息,需要写入 yaml 文件:
# Train/val/test sets as 1) dir: path/to/imgs, 2) file: path/to/imgs.txt, or 3) list: [path/to/imgs1, path/to/imgs2, ..]
path: /home/funnywii/Documents/tsariDataset  # dataset root dir
train: images/train  # train images (relative to 'path')
val: images/val  # val images (relative to 'path')
test:  # test images (optional)

# Classes
nc: 10  # number of classes
names:
  0: green straight
  1: red straight
  2: yellow straight
  3: green left
  4: red left
  5: yellow left
  6: green right
  7: red right
  8: yellow right
  9: unknown
之后即可开始训练。Python 代码如下,train() 函数中更多 hyperparameters 和 configurations 可以在 https://docs.ultralytics.com/usage/cfg/#train 中找到。
from ultralytics import YOLO

# Load a model
model = YOLO("../models/yolov8x.pt")  # load a pretrained model (recommended for training)

# Train the model
model.train(data="../test.yaml", epochs=100, imgsz=640, batch=4)

# Evaluate the model's performance on the validation set
model.val()
报错
torch.cuda.OutOfMemoryError: CUDA out of memory. Tried to allocate 48.00 MiB (GPU 0; 7.75 GiB total capacity; 6.70 GiB already allocated; 40.06 MiB free; 6.77 GiB reserved in total by PyTorch) If reserved memory is >> allocated memory try setting max_split_size_mb to avoid fragmentation. See documentation for Memory Management and PYTORCH_CUDA_ALLOC_CONF
原因在于你滴模型太大辣,而你滴显存太小辣。可以看到我使用的 pretrained 模型是 yolov8x.pt,也就是最大那一个。
这种情况下,可以尝试降低 batch、降低 imgsz,或者换成更小的模型,比如 yolov8n.pt、yolov8s.pt。对我当前这张显卡来说,设置 batch=4 一般能解决。
C++ 部署
本部署基于 MMYOLO 训练得到的模型。
需要注意,.engine 是 TensorRT 序列化后的引擎文件,和 TensorRT 版本、GPU 架构、CUDA 版本、插件版本等环境强相关,不建议跨机器直接复用。一般在目标机器上完成 ONNX 到 TensorRT engine 的转换。
首先新建 detector.h 和 detector.cpp 文件。
在头文件中,先声明一个关于 Bounding Box 的结构体,用于存放 BBox 相关内容:
typedef struct Bbox
{
    int x1;
    int y1;
    int x2;
    int y2;
    float score;
    int label;
} Bbox;
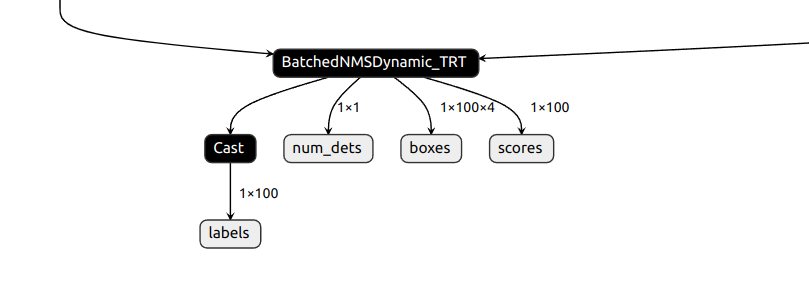
根据由 MMYOLO 得到的模型,使用 Netron 查看可以看出模型 binding 输出 4 个内容,包括类别、目标数量、bbox 和置信度:
一般来说,TensorRT 推理模型的流程为:
- 使用 TensorRT 的 Builder API 创建和优化模型引擎。
- 序列化优化后的模型引擎到磁盘,或者从磁盘加载模型引擎到内存中。
- 创建 TensorRT 运行时对象(IRuntime)。
- 使用 TensorRT 运行时对象创建执行上下文(IExecutionContext)。
- 为模型输入和输出分配内存。
- 执行推理。
在检测相关的 Class Detector 中,要新建几个变量来保存 engine 模型的输出。
class Detector {
private:
    // build engine
    static const int INPUT_C = 3;               // Channels
    static const int INPUT_H = 640;             // Height
    static const int INPUT_W = 640;             // Width
    static const int OUTPUT_LABEL_SIZE = 100;   // Output tensor - max label num
    static const int OUTPUT_SCORE_SIZE = 100;
    static const int OUTPUT_BOX_SIZE = 100 * 4;
    static const int OUTPUT_NUM_SIZE = 1;
    const char* INPUT_BLOB_NAME = "images";     // The input name of Engine, can be seen in NETRON
    const char* OUTPUT_SCORE_BLOB_NAME = "scores";
    const char* OUTPUT_LABEL_BLOB_NAME = "labels";
    const char* OUTPUT_BOX_BLOB_NAME = "boxes";
    const char* OUTPUT_NUM_BLOB_NAME = "num_dets";
    Logger gLogger;
    string engineFile = "../models/best0713.engine";

    // inference
    vector<float> processedImg = vector<float>(INPUT_C * INPUT_H * INPUT_W);

    IRuntime *runtime;          // 创建、管理和执行 TensorRT 推理引擎
    ICudaEngine *engine;        // TensorRT 优化后的模型 engine
    IExecutionContext *context; // TensorRT 模型执行上下文
    cudaStream_t stream;        // 用于异步执行 CUDA 操作的 CUDA stream
    int inputIndex, outputIndex_box, outputIndex_score, outputIndex_label, outputIndex_num;
    void *buffers[5];           // 保存输入和输出 tensor 的 GPU buffer

    float data[BATCH_SIZE * INPUT_C * INPUT_H * INPUT_W];   // Input image
    float boxes[BATCH_SIZE * OUTPUT_BOX_SIZE];              // Output bbox
    float scores[BATCH_SIZE * OUTPUT_SCORE_SIZE];           // Score
    int labels[BATCH_SIZE * OUTPUT_LABEL_SIZE];             // Label(class)
    int num_det[BATCH_SIZE * OUTPUT_NUM_SIZE];              // Num of detected objects
    vector<Bbox> bboxes;

    // post process
    float thresh = 0.3;     // Threshold for confidence
    float iou_thresh = 0.5; // Threshold for NMS IoU

    // Visualization image size
    int VIS_H = 720;
    int VIS_W = 1280;

    // Palette for traffic light
    vector<cv::Scalar> PALETTE = {
        cv::Scalar(0, 250, 148),
        cv::Scalar(255, 48, 48),
        cv::Scalar(255, 255, 0),
        cv::Scalar(0, 250, 148),
        cv::Scalar(255, 48, 48),
        cv::Scalar(255, 255, 0),
        cv::Scalar(0, 250, 148),
        cv::Scalar(255, 48, 48),
        cv::Scalar(255, 255, 0),
        cv::Scalar(0, 0, 255),
    };

    // Class names
    vector<string> NAMES = {
        "green straight", "red straight", "yellow straight", "green left", "red left",
        "yellow left", "green right", "red right", "yellow right", "unknown"
    };

    // Camera calibration
    cv::String calibFile = "../src/calib.yaml";
    cv::Mat map_x, map_y;    // Used in remap

    // count
    Counter counter;
};
这里的 BLOB 名称沿用了代码里的变量命名习惯,但在 TensorRT 语境下,更准确的说法是 input / output binding 或 tensor。也就是说,images、scores、labels、boxes、num_dets 这些名字对应的是 engine 中输入输出 tensor 的名称。
对应到 detector.cpp 中,首先初始化 TensorRT 的 Logger 插件,随后使用 DEVICE=0,也就是机器上唯一一张可怜的显卡,来创建 CUDA 推理引擎。读取 engine 文件时使用 binary 方式,因为 engine 是二进制格式文件,读取方式和普通文本文件不同。之后根据模型大小开辟一块内存,其指针为trtModelStream。
然后创建一个 runtime 对象,并反序列化(deserialize)引擎。
模型从 pt 到 engine 格式,是一个序列化(serialize)的过程;使用这个 engine 推理,则是反过来的反序列化过程。
Detector::Detector()
{
    cout << "Starting initializing model" << endl;

    // Init the TensorRT plugins
    initLibNvInferPlugins(&gLogger, "");

    // Build TensorRT engine
    cudaSetDevice(DEVICE);
    char *trtModelStream{nullptr};
    size_t size{0};

    // Binary mode reading engine
    std::ifstream file(engineFile, std::ios::binary);
    if (file.good())
    {
        file.seekg(0, file.end);
        size = file.tellg();
        file.seekg(0, file.beg);
        trtModelStream = new char[size];
        assert(trtModelStream);
        file.read(trtModelStream, size);
        file.close();
    }

    runtime = createInferRuntime(gLogger);
    assert(runtime != nullptr);
    engine = runtime->deserializeCudaEngine(trtModelStream, size);
    assert(engine != nullptr);
    context = engine->createExecutionContext();
    assert(context != nullptr);

    std::cout << engine->getNbBindings() << std::endl;
    for (int i = 0; i < engine->getNbBindings(); i++) {
        Dims dims = engine->getBindingDimensions(i);
        DataType dtype = engine->getBindingDataType(i);
        std::string name = engine->getBindingName(i);
        if (engine->bindingIsInput(i)) {
            std::cout << "Input " << i << " " << name << std::endl;
        }
        else {
            std::cout << "Output " << i << " " << name << std::endl;
        }
    }

    assert(engine->getNbBindings() == 5);
    inputIndex = engine->getBindingIndex(INPUT_BLOB_NAME);
    outputIndex_box = engine->getBindingIndex(OUTPUT_BOX_BLOB_NAME);
    outputIndex_score = engine->getBindingIndex(OUTPUT_SCORE_BLOB_NAME);
    outputIndex_label = engine->getBindingIndex(OUTPUT_LABEL_BLOB_NAME);
    outputIndex_num = engine->getBindingIndex(OUTPUT_NUM_BLOB_NAME);
    delete[] trtModelStream;

    // Create GPU buffers on device
    CHECK(cudaMalloc(&buffers[inputIndex], BATCH_SIZE * INPUT_C * INPUT_H * INPUT_W * sizeof(float)));
    CHECK(cudaMalloc(&buffers[outputIndex_box], BATCH_SIZE * OUTPUT_BOX_SIZE * sizeof(float)));
    CHECK(cudaMalloc(&buffers[outputIndex_score], BATCH_SIZE * OUTPUT_SCORE_SIZE * sizeof(float)));
    CHECK(cudaMalloc(&buffers[outputIndex_label], BATCH_SIZE * OUTPUT_LABEL_SIZE * sizeof(int)));
    CHECK(cudaMalloc(&buffers[outputIndex_num], BATCH_SIZE * OUTPUT_NUM_SIZE * sizeof(int)));

    // Init calibration
    cv::FileStorage fs(calibFile, cv::FileStorage::READ);
    cv::Mat camMatrix, distCoeffs;
    cv::Mat R = cv::Mat::eye(3, 3, CV_64F);

    int height, width;
    fs["CameraMatrix"] >> camMatrix;
    fs["DistortionCoeffs"] >> distCoeffs;
    fs["Resolution width"] >> width;
    fs["Resolution height"] >> height;
    cv::Size sz(width, height);
}
参考文章
[1] YOLOv8 原理和实现全解析
评论