

系统环境
系统:Ubuntu 22.04
显卡:RTX5880 48G
内存:64G
PyTorch:2.4.0+
模型说明
阿里巴巴旗下Wan团队开源的。
包括以下核心模型:
其中:
MoE:Mixture of Experts,混合专家架构
VAE:Variational Autoencoder,变分自编码器
T2V/I2V/TI2V/S2V:分别为 Text-to-Video、Image-to-Video、Text&Image-to-Video、Speech-to-Video 的缩写
安装Wan2.2
首先安装显卡驱动和 CUDA 等 NV 全家桶,可以参考:Ubuntu显卡驱动以及CUDA、cuDNN、TensorRT的安装 - FunnyWii's Zone
CUDA:12.1
cuDNN:8.9.2
官方仓库没有告知最小 CUDA 和 cuDNN 版本。只能根据 torch≥2.4.0 确认 CUDA 要大于 11.7。搜了很多关于 Wan 的 CUDA 依赖的文章,都是 AIGC,没啥参考价值。
安装 conda
# 安装最新版x86 conda
curl -O https://repo.anaconda.com/miniconda/Miniconda3-latest-Linux-x86_64.sh
sudo chmod +x Miniconda3-latest-Linux-x86_64.sh
./Miniconda3-latest-Linux-x86_64.sh
# 创建虚拟环境
conda create -n wan2.2 python=3.10
conda activate wan2.2
克隆 Wan 的 Repo,并安装依赖
git clone https://github.com/Wan-Video/Wan2.2.git
cd wan2.2
pip install -r requirements.txt
在安装 flash_attn 阶段,大概率会遇到问题。
Collecting flash_attn (from -r requirements.txt (line 15))
  Downloading https://pypi.tuna.tsinghua.edu.cn/packages/3b/b2/8d76c41ad7974ee264754709c22963447f7f8134613fd9ce80984ed0dab7/flash_attn-2.8.3.tar.gz (8.4 MB)
     ━━━━━━━━━━━━━━━━━━━━━━━━━━━━━━━━━━━━━━━━ 8.4/8.4 MB 1.1 MB/s  0:00:07
  Installing build dependencies ... done
  Getting requirements to build wheel ... error
  error: subprocess-exited-with-error

  × Getting requirements to build wheel did not run successfully.
  │ exit code: 1
  ╰─> [19 lines of output]
      /tmp/pip-build-env-8wf9n6w6/overlay/lib/python3.10/site-packages/setuptools/_vendor/wheel/bdist_wheel.py:4: FutureWarning: The 'wheel' package is no longer the canonical location of the 'bdist_wheel' command, and will be removed in a future release. Please update to setuptools v70.1 or later which contains an integrated version of this command.
        warn(
      Traceback (most recent call last):
        File "/home/weifangyuan/miniconda3/envs/wan2.2/lib/python3.10/site-packages/pip/_vendor/pyproject_hooks/_in_process/_in_process.py", line 389, in <module>
          main()
        File "/home/weifangyuan/miniconda3/envs/wan2.2/lib/python3.10/site-packages/pip/_vendor/pyproject_hooks/_in_process/_in_process.py", line 373, in main
          json_out["return_val"] = hook(**hook_input["kwargs"])
        File "/home/weifangyuan/miniconda3/envs/wan2.2/lib/python3.10/site-packages/pip/_vendor/pyproject_hooks/_in_process/_in_process.py", line 143, in get_requires_for_build_wheel
          return hook(config_settings)
        File "/tmp/pip-build-env-8wf9n6w6/overlay/lib/python3.10/site-packages/setuptools/build_meta.py", line 333, in get_requires_for_build_wheel
          return self._get_build_requires(config_settings, requirements=[])
        File "/tmp/pip-build-env-8wf9n6w6/overlay/lib/python3.10/site-packages/setuptools/build_meta.py", line 301, in _get_build_requires
          self.run_setup()
        File "/tmp/pip-build-env-8wf9n6w6/overlay/lib/python3.10/site-packages/setuptools/build_meta.py", line 520, in run_setup
          super().run_setup(setup_script=setup_script)
        File "/tmp/pip-build-env-8wf9n6w6/overlay/lib/python3.10/site-packages/setuptools/build_meta.py", line 317, in run_setup
          exec(code, locals())
        File "<string>", line 22, in <module>
      ModuleNotFoundError: No module named 'torch'
      [end of output]

  note: This error originates from a subprocess, and is likely not a problem with pip.
ERROR: Failed to build 'flash_attn' when getting requirements to build wheel
去 flash_attn 的 Releases · Dao-AILab/flash-attention 页面下载 whl 文件,注意 cuda,torch 和 Python 版本要匹配。
下载完成后安装,要是还不行,我也不知道了。
pip install flash_attn-2.8.3+cu12torch2.5cxx11abiFALSE-cp310-cp310-linux_x86_64.whl到这里,你已经可以通过源码来使用模型了,参考 Wan 的官方命令就行。
而且如果你使用无 GUI 的服务器,也可以到此为止了,下面 ConfyUI 的内容,是为了用户图形界面。
python generate.py --task i2v-A14B --size 1280*720 --ckpt_dir ./Wan2.2-I2V-A14B --offload_model True --convert_model_dtype --image examples/i2v_input.JPG --prompt "Summer beach vacation style, a white cat wearing sunglasses sits on a surfboard. The fluffy-furred feline gazes directly at the camera with a relaxed expression. Blurred beach scenery forms the background featuring crystal-clear waters, distant green hills, and a blue sky dotted with white clouds. The cat assumes a naturally relaxed posture, as if savoring the sea breeze and warm sunlight. A close-up shot highlights the feline's intricate details and the refreshing atmosphere of the seaside."记得激活你的 conda 环境。
安装ComfyUI
Linux 只能源码安装 ComfyUI,记得激活 conda 环境。
ComfyUI 的环境和 Wan 的不冲突,可以在 Wan 的基础上继续装。
本质原因是,ComfyUI 不依赖于任何其他源码仓库,它只需要模型。
git clone https://github.com/Comfy-Org/ComfyUI
cd ComfyUI
pip install -r requirements.txt
进入 ComfyUI 的路径,打开终端,运行
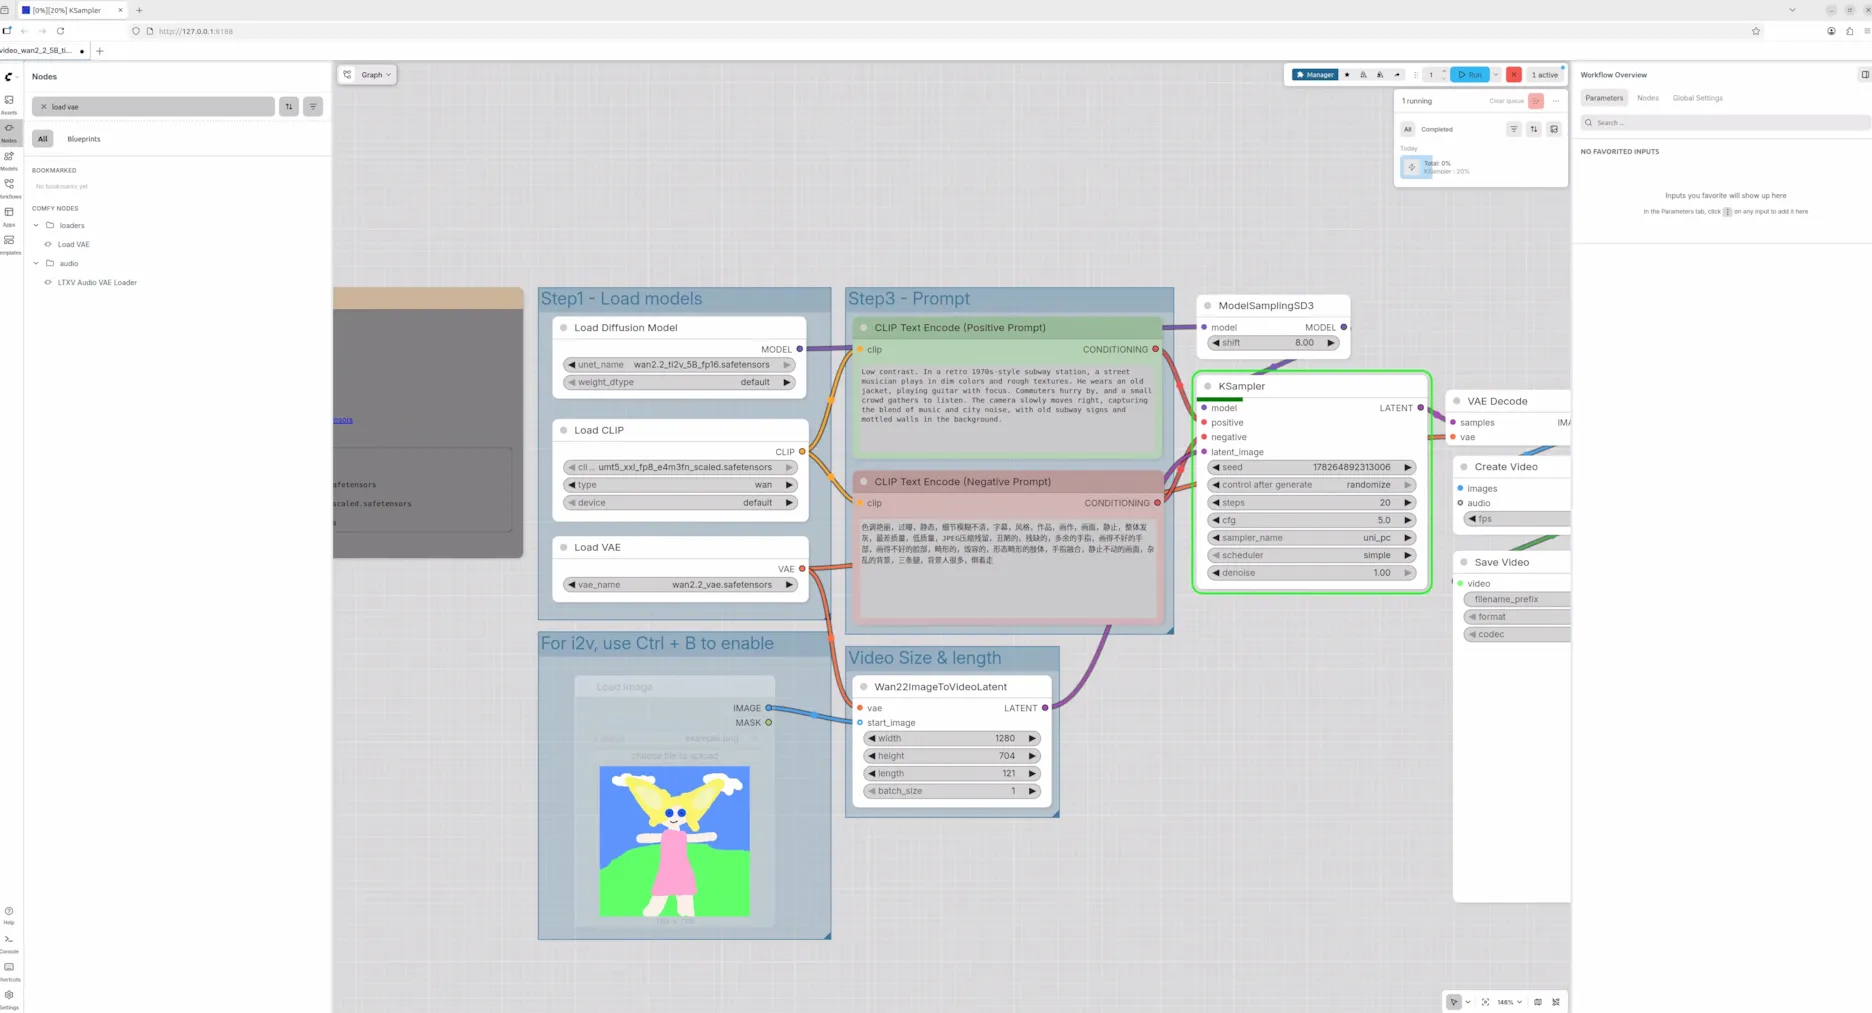
python main.py 点击终端打印的地址,比如http://127.0.0.1:8188,就可以看到界面了。下图是 ComfyUI 官方提供的一个工作流。
再说点网上没人说过的。
Wan 官方提供的两种模型下载途径,扩散模型都分片了,分片模型的术语叫 shard,如果想自己搜索别去搜什么 split 和 multi-part。
分片的模型在 Wan 仓库中使用源码运行,是没问题的。
但是在 ComfyUI 官方提供的工作流的节点,并不支持分片模型加载(其实是我没找到方法)。Reddit 中有人提到只要把分片模型和 config 文件放在同一个文件夹去加载就行了,我没成功。
如果想使用官方节点加载模型,需要前往 Wan2.2 Video Generation ComfyUI Official Native Workflow Example - ComfyUI 下载3个格式为 safetensors 的单一模型文件。然后将3个模型分别放到 ComfyUI/models 对应的路径下
其中
diffusion:扩散模型,用于文/图生视频,5B 代表参数50亿。
VAE:变分自编码器,用于视频编解码,图像和视频转换为模型可处理的表示,再将模型生成的表示转换为视频。
UMT5(CLIP):文本编码器,将用户输入的 prompt 转换为模型可处理的向量表示。
safetensors 是 Hugging Face 提供的文件格式,里面只包含数值,无代码,不用担心恶意代码执行。
评论